Ed's
AV Handbook
Batting practice for the AV Professional
and primer for the novice
Chapter 6 Page 5
The Room, Speaker, & TV
The
Speaker System continued
Home Theater Surround
Choose the center speaker
location
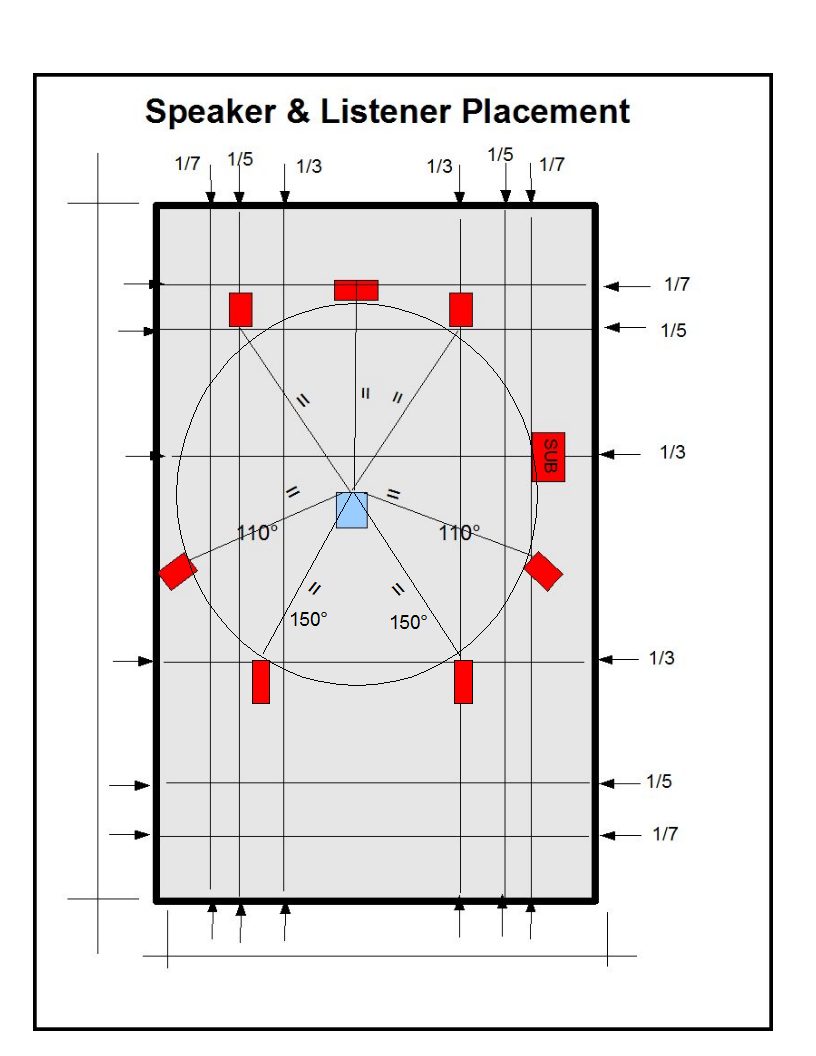
Measure the distance from the listening 'sweet spot' position to the front left or right speaker. This measurement is the distance from the 'sweet spot' to the center speaker location centered between the front and right speakers.
Select rear speaker locations
Dolby Labs 5.1 surround sound
specifications position the two rear channel speakers at 110
degrees left and right of the front center speaker.
Draw a circle through the front left, center, and right
speaker positions with the 'sweet spot' at the
center.
Place the left and right rear speaker on the circle at the
specified 110-degree positions.
Provide unobstructed sound paths to the listener's ears.
This may require moving the speaker above ear level.
A 6.1 and 7.1 surround system adds additional rear speakers to
the 5.1 arrangement. A 6.1 system places an
additional-rear speaker on the circle at 180 degrees from the
center speaker. A 7.1 system adds two rear
speakers placed at 150 degrees left and right of the front
center speaker.

Note for the small room.
If room boundaries are closer
than specified for rear speaker locations, move the speakers
well above or below ear level.
Or consider the option of an above ear level on-wall
dipole/bipole speakers placed at 90 degrees left and right
of the front center speaker.
Each option can generate a diffuse sound pattern that still
recreates the desired effect.
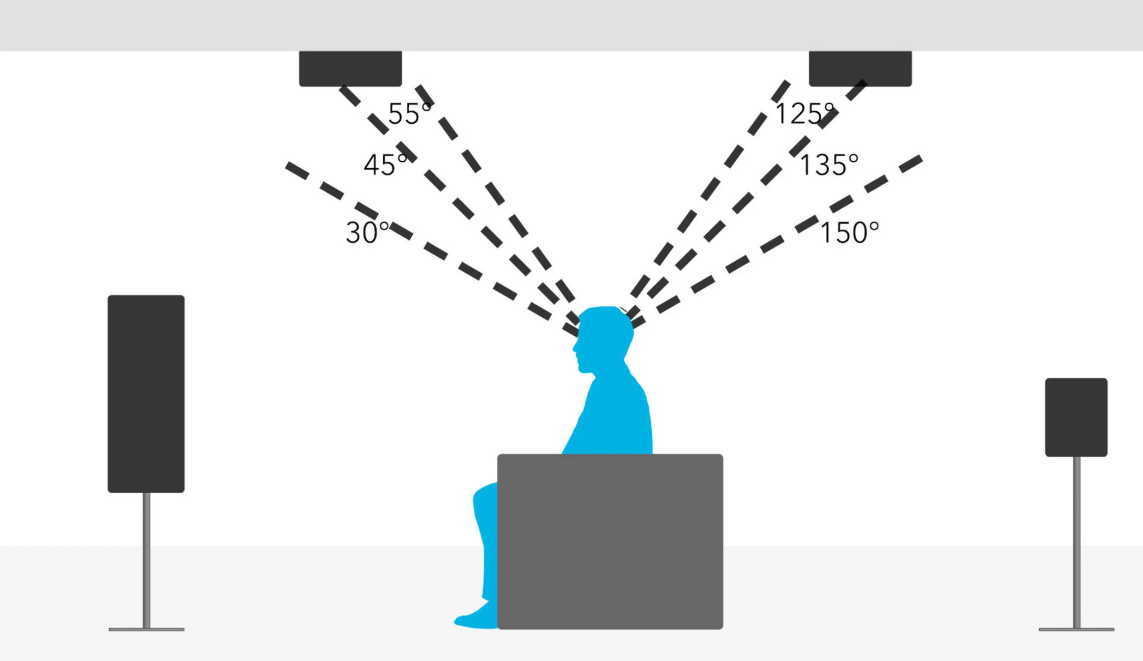
Dolby Atmos ceilng speaker placement

Many home theater rooms cannot accommodate Dobly speaker placement.
This Dolby Labs Link offers many options plus Atoms alternatives.
Subwoofer Placement
There are two general-schools
regarding subwoofer type and placement. The first school
places the subwoofer at a position that avoids stimulating a
primary room mode and its first, second, and possibly third
harmonic, which locates the subwoofer in an area less than 25%
but more than 10% from the dimension of any room boundary.
The second school places the subwoofer in an acoustical
pressure zone, the corner of a room. This type of
placement acoustically stimulates and endeavors to manage and
use low-frequency room modes. Follow the manufacturer's
placement/adjustment instructions for the best results.
An alternative to the first school temporarily places the
subwoofer at the listening 'sweet spot' position. Set up
a quick temporary adjustment of the subwoofer
calibration. Then while listening to a musical recording
with good bass content --- walk around the room. Locate
positions where the subwoofer sounds best.
Select a practical option. Then move the subwoofer to
that position. This position should reciprocate the
acoustical-effect of the listening position.
Another option -- Use two or
more subwoofers. Two subs more easily raise decibel
level and improve dynamics.
Subwoofers placed opposite each other may also offset room
mode issues.
Subwoofer Calibration
Finally, with each of the above
methods, set the subwoofer volume to its minimum level, and
its crossover to its highest position/frequency.
Next, using white-noise as a source and a C-weighted SPL
meter, adjust each of the main speakers to a reference level
of 85 decibels.
Then adjust the subwoofer to the same decibel level.
Now, using a musical source -- adjust the subwoofer
cross-over, fine-tune its volume level,
until the subwoofer sounds musically balanced with the main
speaker system.
Copyright 2007 Txu1-598-288 Revised 2025
Sponsored By

Architectural Speaker Tuning System
Site Menu
Home
Table of
Contents
Handbook Chapters
1 AV
Terms
2 AV Physics
3 Sound Reproduction
4 Video Reproduction
5 The AV System Sequence
6 The Room, Speaker, & TV
7 Acoustical Strategy - Small Room
8 Home Theater by Design
9 AV Sales Training
10 AV Business & Marketing
Contact
About